Bass, Guitar and Vocal Recording and Mixing

Following on from the previous blog post which detailed the drum recording and mixing setup, this post focuses on how the Bass, Guitar and Vocals were recorded and mixed.

Bass

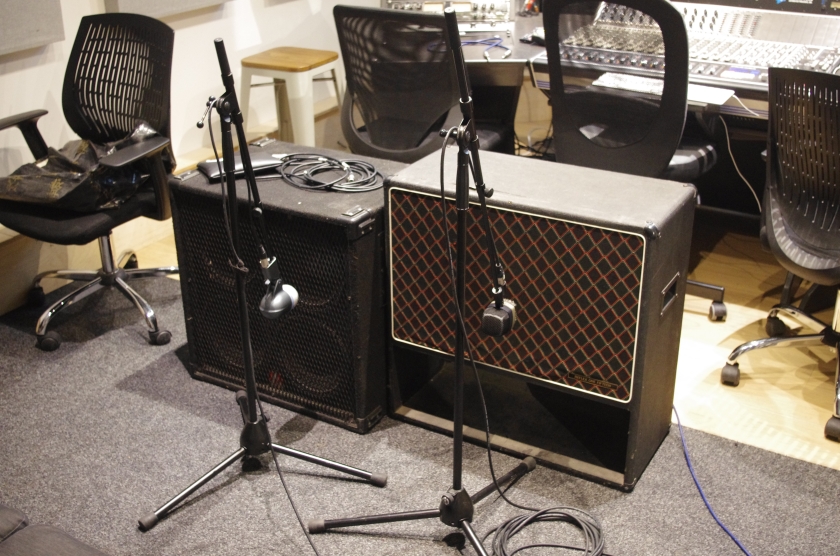
Recording and mixing the bass guitar was one of the most challenging aspects of this recording process, due to the Jason’s distinct combination of low frequency rumble and fuzz. Jason’s rig featured a Trace Elliot amplifier head and two bass cabs with differing speaker sizes (15″ and 10″).
To prevent the bass bleeding on to other recorded content, Jason’s cabs were placed inside the control room of studio 3 which worked as an isolation booth.
The microphones that were used on the bass guitar cabs were the AKG D12VR and Shure Beta 52.

K51_4695.JPG

Bass Mixing

EQ was applied to both of these channels, mainly to remove the low frequency content. This EQ decision was made because the low frequency build up from both amp cabs was overwhelming on both microphones. To replace the low frequency content, and therefore use the amp signals as a tonal addition of fuzz, a DI signal was taken from the bass guitar pre-effects. This meant that a consistent and balanced low end could be achieved, without overwhelming the mix.

All bass signals were not routed to the main mix bus, however, instead; all bass signals were routed (via track bus 24) to the Warm Audio WA2A, before returning on channel 21 (labelled bass sum). By using an optical compressor, the bass guitar could be compressed heavily, without it reacting quick enough to disturb the transient of each note.

Guitar

When miking Alex’s guitar cabs, the aim was to create a tone that sounded like it was from one source but subtly different in the left and right stereo field, in order to achieve greater stereo width. To achieve this, I used a pair of Sennheiser HD421  microphones to mic both cabs. both were placed in similar areas on the speaker cabinets, however, the left mic was positioned slightly more off axis.


Guitar Mixing 

In order to create a wide guitar sound, the first step of mixing involved using a sample delay in ProTools. Following the principle of the Haas effect, this would create more stereo width when panning the guitar channels hard left and right.
once returning to the SSL channel strip, the guitars were EQ’d identically to remove low end, add presence and soften the brittle high end before routing to the Neve 33609 Stereo Compressor via the channel insert. This was used in order to, once more provide the consistency that would typically be achieved through automation and compression during mixing.

Vocals

Vocals were originally setup to be recorded using a Shure SM7b, however, under Al’s request this was exchanged for a Shure SM58. This decision was made in order to reject more spill from the guitar amps and drums, as well as promoting a better performance from Al, who is used to using an SM58 when performing live.

Vocal Mixing

When mixing vocals, the first stage involved using the SSL preamp’s VHD ‘Variable Harmonic Drive’ function to drive Al’s vocal signal. Following this, the vocal was routed to the Vermona VSR 3.2 vintage spring reverb via an FX send. Following this, the reverb returned to another channel which allowed me to ride the fader according to Al’s vocal part and the amount of reverb that it suited.

Mix Bus processing

Before routing the final mix to the mastering chain, I used the SSL’s Mix Bus compressor to gently control the average dynamics of the mix, as well as aiding in glueing the mix together. A low ratio of 2:1 was used with a medium attack and slower release was used to achieve this. By using a lower ratio, the compressor could be pushed harder. This meant that average the average dynamics of a performance could be smoothened effectively.


Mastering

After recoding the mix into ProTools, in order to allow for the possibility of other releases such as vinyl. I then routed the mix to a mastering rig which contained a Maselec MLA-2 Stereo mastering compressor and D.A.V electronics Broadhurst Gardens No.3 Stereo Mastering EQ. From here, a relatively high compression ratio of 5:1 was used with a quick attack and slightly slower release in order to mainly control transient peaking content. In combination with the mix bus compression, both average dynamics and transients were, therefore, controlled. The EQ processing that was applied was shelf attenuation at 25Hz, a shelf boost at 32KHz and a small boost and 120Hz, creating a more balanced master recording.
Finally, the master signal returned to ProTools, where a Limiter was implemented to ensure that transient material did not risk peaking at 0dBfs. If a signal did reach 0dBfs, this would distort the recording that we only had one take to get right…


Drum Recording and Mixing

Although much of the recording plan remained the same, a number of changes were made on the recording day.

Drums
The final recording setup for drums featured an Audix D6 on the front of the kick drum with a Shure SM57 directed toward the beater. This setup allowed a balance between low end energy and the attack of the beater to be created.

K51_4681.JPG

Having never used the Audix D6 before, I was pleasantly surprised by how broad its response to the kick drum was. A balance could have been created with only this mic, however, because the SM57 had slightly more clarity in the higher mid frequencies, the decision was made to continue using a two mic setup. Although the Audix appears to be placed unusually far out of the kick drum, I found that this position captured a lot of the low frequency energy that this mic was intending to focus on.

To record the snare drum, I used a Shure SM57 on the top skin and an AKG C414 on the bottom. This, once again allowed me to create a balance between the two tonal aspects of this drum, as well as creating a focussed snap to the snare sound, through using a 414 set to figure of eight polar pattern. Typically, a cardioid polar pattern would be more desirable in this scenario, however,  I found that too much bleed from the kick drum was present on the under snare microphone in the cardioid position. By using a figure of eight pattern, more side rejection was created, which removed much of the kick beater.
Directing the top snare microphone slightly toward the rim of the drum cartured more resonance, however, this became too present on the overall tone. To counter this, moon gel was applied to the skin, which dampened much of these overtones.

When recording the toms, it would’ve been ideal to use an identical microphone design for each drum. My initial choice out of the mic cabinet was the Electrovoice RE20 because of its exceptional response to lower frequency content as well as its ability to handle SPL without distorting. Unfortunately, on the recording day there were only 2 available. To get around this issue, a Shure SM7b was used on the rack tom. Being a dynamic broadcast microphone, the SM7b is similar to the RE20 in many ways. The main difference would be the RE20’s slightly extended low end response which I noted through testing the microphones on the same drum. Using the SM7b on the rack tom was, therefore, appropriate because of the higher pitch of this drum and its inability to generate as much low frequency content. Having listened to the demoes that were provided by Yo No Se; I also understood that much of the tom drum content was focussed on the floor toms, therefore, I felt it was important to make these sound as cohesive and related as possible.


As well as close miking the elements of the kit mentioned above, a spot mic was placed on the hi-hat. This was used to provide a consistent hi-hat signal for mixing, as I knew I would not be able to use editorial mixing techniques, such as clip gain automation, on the fly whilst recording. The microphone that was selected was my Electro Voice RE-200, due to its detailed response to high frequencies, presence lift and its unidirectional polar pattern.

K51_4684.JPG

When capturing the cymbals and overall spatial impression of the kit, I used a matched pair of Neumann U87’s which are large diaphragm condenser microphones. Having mostly used small diaphragm condensers as overhead microphones in the past, I was pleased with how smooth the high end was represented with these microphones. Clarity was achieved without a brittle or harsh tonality also being present.
These microphones were placed as a spaced pair, with the intentional of creating a big and wide drum sound during mixing, given the style of Yo No Se’s music and their small band size which allowed more stereo space to be occupied by individual elements.

K51_4693.JPG

Drum Mixing

When mixing the drums, it was recognised that a fine balance needed to be achieved between dynamics processing and room ambience/spill. Due to the fact that all band members and guitar amps were in the same room, compression in particular would result in less distinction between each element of the kit and room spill would be lifted, if used too aggressively.

Using the SSL Duality’s EQ the front kick drum microphone was affected by attenuation in the high frequencies at 15KHz, a small attenuation across the mids at approximately 3KHz and 850Hz and a low frequency boost at 40Hz.
This added body and punch to kick which could be blended with the beater microphone for an aggressive kick drum sound. As well as EQ, the Warm Audio WA76 was used as an insert on the front kick drum mic, in order to create a more consistent kick drum mix and improve the sustain of the kick.

When mixing the snare drum, the SSL’s channel strip compressor was used with a fast attack engaged and a fairly high ratio. This was used to provide consistency to the snare drum, given that I could not editorially manipulate this recording through methods such as clip gain automation.
A low frequency roll of was also used on this, in order to remove the kick drum from this channel, isolating the snare further.

When EQing, the toms were affected in much the same way. For each of the drums I swept through the high frequencies as Thom hit them, aiming to locate the area that the attack of the drum sat. One located for all tom drums, a small boost was applied to these frequencies, to aid in allowing the drum to pop out in the mix a little when hit.
A similar process was then used to find and boost the resonant low mid frequency body/pitch of each of the drums. Once this was complete, each of the drums was placed in the stereo pan, according to their position in the overhead microphones.

The hi-hat recording needed no additional processing because the microphone pairing worked really well in this application and naturally rejected low frequency content. This channel was panned according to its position in the overhead microphones.

Finally, when mixing the overhead microphones, low frequencies were first attenuated slightly. This removed much of the low rumble of Alex’s guitar amps and also the low energy of the kick drum. Following this, a slight attenuation at 1.5KHZ was used on both microphones, in order to soften the piercing content that was occasionally present in the cymbals. These were then panned according to the drummers perspective, left and right, however, this was not hard left and hard right as I anticipated stereo width in the electric guitar recording as well.

Originally, I had planned to use drum bus compression to glue the individual elements of the kit together and restrict the dynamics of the drums to create a more consistent mix. Unfortunately, in this setup this was unsuccessful because of the amount of guitar spill on the drum microphones which was only accentuated by mix bus compression.
To resolve this, rather that using the entire drum bus, I routed only the kick and snare microphones to Mix Bus B and patched into the Empirical Labs Distressors. Following heavy compression and distortion using the Distressors, I patched into the Warm Audio WA-EQP, in order to tonally enhance this heavily compressed signal. This signal was then routed into channels 19 and 20, where it was used as a parallel signal to the drum kit, adding consistency and a more aggressive tonality.

K51_4706