When recording with multiple musicians in the same room, isolation is crucial in ensuring flexibility during mixing and mastering. This is particularly important if compression is being used extensively because, if bleed from other elements of the recording is too present, it will be exaggerated, making every recorded element lose focus and clarity.
As well as this, the stereo image of the final mix will be less defined because, as individual elements are panned, bleed from every other instrument will also be panned. This means that individual elements cannot be placed in their own stereo location.
To prevent this, microphone position and polar patterns should be used with the intention of reducing bleed.
The final microphone setup will be most likely be different to what has been planned. It is important to highlight what are the crucial elements of the kit that must be focussed upon and understand the limitations of the recording setup. On Friday 30th March, the band and I will work set up the drum kit according to the plan that I have created before evaluating which elements are effective and which must change
The preliminary setup for capturing the drum kit is outlined below:
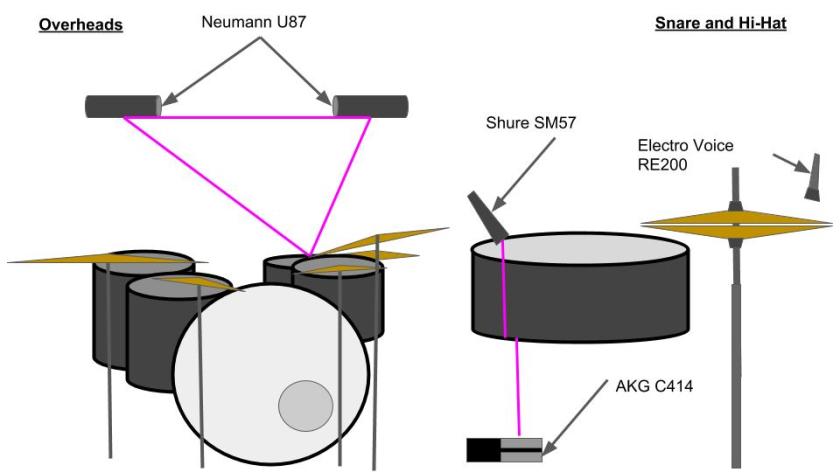
Overheads
Firstly, the overhead microphones will be a matched pair of Neumann U87s. These will be set to cardioid polar pattern and placed as a spaced pair.
These should aim to capture a balance of the whole kit, with particular focus upon the cymbals. A spaced pair configuration has been suggested due to the stereo width that can be achieved. Due to Yo No Se containing three band members, positioning each subject within a stereo field will be easier to retain space, without having many elements positioned in a single location.
Snare and Hi-Hat
The snare setup that I intend to employ will likely be a two mic setup which uses a Shure SM57 on the top and an AKG C414 on the bottom. These microphones each focus on a different element of the snare drum. The top microphone will be directed at the point at which the stick hits the drum skin. This microphone will capture the attack and punch associated with rock snare drums. The second microphone will capture the snares on the bottom of the drum. Due to the fact that the snares of a drum generate a relatively quiet high frequency sizzle, a condenser microphone has been suggested, due to the sensitivity that is associated with this microphone design. The AKG C414 has been chosen because of its flexibility. The C414’s high pass filter will be particularly useful in rejecting the kick drum, for instance. Whilst having interchangeable polar pattern will allow the right amount of focus and ambience to be achieved. A figure of eight or hypercardioid pattern will aid in rejecting the kick drum beater click that is likely to bleed onto this position.
The phase relationship between these microphones is crucial. In my experience, if two snare microphones are not correctly phase aligned, the body of the drum is often attenuated or cancelled entirely. Because of this, I should aim to keep microphones equidistant from the top skin of the drum as well as reversing the polarity on one of the microphones.
As well as micing the cymbals using overhead mics, a hi-hat microphone has been planned in order to reinforce the rhythmic content that drives Yo No Se’s music. This microphone will most likely be subtly applied to create a more consistent reproduction of the hi-hat. The microphone that will be used in this situation must respond to transient material and be unidirectional. The microphone that I currently plan to use is an Electro-Voice RE200 because of its rising frequency response beyond 1KHz which makes it tailored toward reproducing high frequency details. Being a small diaphragm condenser microphone, this mic is sensitive to transient material, as well as having a cardioid polar pattern which will allow me to focus solely on the hi-hat.
Kick Drum and Toms
A similar technique to the snare drum setup has been planned for recording the kick drum, because two mics will also be implemented on each skin of the drum. The first microphone will aim to capture the high mid-frequency attack of the beater hitting the drum skin. This will most likely be a Shure SM57, because of its presence peak at around 6KHz. Following this, an Audix D6 can be inserted just into the soundhole of the kick drum. This microphone aims to capture the low frequency body of the kick drum. Blending these microphones together should create a balanced and realistic kick drum recording.
To mic the toms, I have decided to use Electro-Voice RE20’s. The RE20 is a microphone that is renowned for its responsiveness to low frequencies. By close miking the toms using this, bleed will be rejected by the cardioid polar pattern and a proximity effect should enhance the low mid frequencies of each of the toms. Being a dynamic microphone, it will be less sensitive to other elements of the kit. This means that a gate could be applied, in order to only produce signal when the tom drums are hit, allowing the toms to stand out during rolls and sit back in the mix when not being played. This will avoid capturing the resonance of the drum skins when not being hit.

The next blog posts will focus upon the other elements of the recording.
– Callum Godfroy
